Power Air Fryer XL Manual⁚ A Comprehensive Guide
This comprehensive guide provides you with all the information you need to use your Power Air Fryer XL safely and effectively. From safety precautions to cooking tips and troubleshooting advice, this manual will help you make the most of your new appliance.
Introduction
Welcome to the world of healthy and delicious cooking with the Power Air Fryer XL! This innovative appliance allows you to enjoy crispy, golden-brown fried foods with significantly less oil than traditional deep frying methods. The Power Air Fryer XL uses rapid hot air technology to circulate air around your food, creating a crispy exterior while locking in moisture and flavor.
Whether you’re a seasoned chef or a cooking novice, the Power Air Fryer XL is designed to make cooking fun and easy. With its user-friendly control panel, a variety of preset cooking functions, and a spacious cooking capacity, you’ll be able to prepare a wide range of dishes from appetizers to desserts with ease.
This manual is your guide to unlocking the full potential of your Power Air Fryer XL. It covers everything from safety precautions to detailed instructions on using the control panel, cooking tips, and troubleshooting advice. Get ready to explore a world of culinary possibilities with your Power Air Fryer XL!
Safety Precautions
Your safety is our top priority. Please read and understand these safety precautions before using your Power Air Fryer XL. Failure to follow these instructions may result in personal injury, damage to the appliance, or fire hazards.
• Always unplug the appliance from the power outlet when not in use, before cleaning, or when assembling or disassembling parts.
• Never immerse the Power Air Fryer XL in water or any other liquid. Clean the unit with a damp cloth only.
• Do not use the Power Air Fryer XL if the power cord or plug is damaged.
• Never operate the Power Air Fryer XL without the Fry Basket and Outer Basket properly inserted.
• Do not use the Power Air Fryer XL to reheat or cook frozen foods.
• Never fill the Fry Basket above the “MAX” line. Overfilling may cause food to spill or obstruct airflow, affecting cooking performance.
• Always use oven mitts when handling the hot Outer Basket and Fry Basket.
• Keep the appliance away from flammable materials, such as curtains or paper.
• Do not use the Power Air Fryer XL outdoors or in wet or damp locations.
• Do not place the appliance on or near a hot stovetop or oven.
• Always supervise children when using the Power Air Fryer XL.
• This appliance is not intended for use by persons (including children) with reduced physical, sensory or mental capabilities, or lack of experience and knowledge, unless they have been given supervision or instruction concerning use of the appliance by a person responsible for their safety.
• Never use the appliance for any purpose other than its intended use.
Components and Features
Your Power Air Fryer XL is a versatile kitchen appliance designed to make healthy and delicious meals with ease. It comes equipped with a variety of components and features that make it a joy to use.

• Main Unit Housing⁚ This is the core of your air fryer, housing the heating element, fan, and control panel.
• Outer Basket⁚ This removable basket is where you place your food for cooking. It’s made of durable materials and designed for easy handling.
• Fry Basket⁚ This inner basket sits inside the Outer Basket, providing a dedicated space for your food. It has a non-stick coating for easy cleaning.
• Control Panel⁚ The control panel features a clear LED display, buttons for temperature and timer adjustment, and a preset button for convenient cooking options.
• Spinning Fan⁚ The powerful fan circulates hot air around your food, ensuring even cooking and crispy results.
• Basket Release Button⁚ This button allows you to easily remove the Outer Basket and Fry Basket after cooking.
These components work together to provide you with a seamless air frying experience.
Using the Control Panel
The control panel of your Power Air Fryer XL is user-friendly and allows you to customize your cooking experience. It features various buttons and a display that provides information about your cooking settings. Here’s a breakdown of each element⁚
• Power Button⁚ Pressing the Power Button once will illuminate the control panel and set the default temperature to 370°F. Pressing it a second time will initiate the cooking process.
• Timer Control Buttons⁚ Use the “+” and “-” buttons to adjust the cooking time, one minute at a time. Holding a button down will rapidly change the time.
• Temperature Control Buttons⁚ The “+” and “-” buttons allow you to adjust the cooking temperature in 10°F increments. Holding a button down will rapidly change the temperature. The temperature range is 180°F to 400°F.
• Preset Button⁚ Selecting the “M” Preset Button allows you to scroll through seven popular food choices, each with predetermined time and temperature settings.
• Preset Choices⁚ The seven presets include fries, chops, shrimp, baked goods, chicken, steak, and fish.
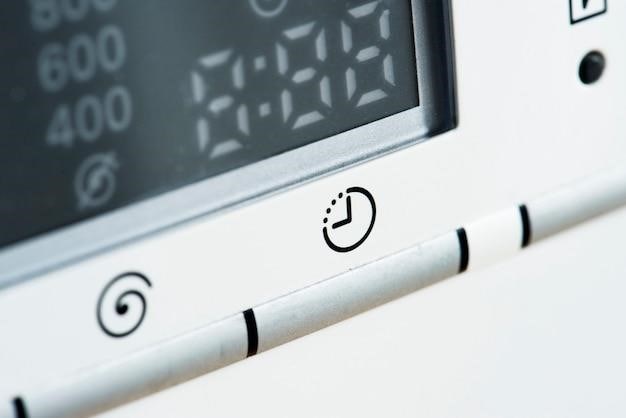
• Time and Temperature Display⁚ This display shows the remaining cook time and current temperature.
• Spinning Fan Display⁚ The spinning fan icon will appear when the unit is turned on and for up to 20 seconds after it is turned off. A red, star-shaped LED will appear in the center of the fan when the unit is in cook or preheat mode.
Familiarize yourself with these controls to ensure you can easily operate your Power Air Fryer XL.
4.1 Power Button
The Power Button is the primary control for your Power Air Fryer XL. It is conveniently located on the control panel, making it easy to access. When you press the Power Button once, it will illuminate the control panel, indicating that the unit is ready for use. It will also automatically set the default temperature to 370°F and the cooking time to 15 minutes. Pressing the Power Button a second time will initiate the cooking process, beginning the countdown timer and activating the heating element. During the cooking cycle, you can press the Power Button to turn off the unit. The red light will turn off, and the blue fan light will continue to spin for 20 seconds. This ensures that the fan continues to circulate the hot air inside the unit, allowing the internal components to cool down safely.
4.2 Timer Control Buttons
The Timer Control Buttons, represented by the “+” and “-” symbols, allow you to adjust the cooking time with precision. These buttons are conveniently located on the control panel, allowing you to easily increase or decrease the cooking time in one-minute increments. Pressing the “+” button will add one minute to the timer, while pressing the “-” button will subtract one minute. If you need to make larger adjustments quickly, simply hold down the desired button. The timer will then rapidly increase or decrease, allowing you to quickly set the desired cooking time for your meal. This flexibility ensures that you have complete control over the cooking process and can achieve the perfect level of doneness for your food.
4.3 Temperature Control Buttons
The Temperature Control Buttons, also marked with “+” and “-” symbols, are designed to give you precise control over the cooking temperature. Located on the control panel, these buttons allow you to adjust the temperature in increments of 10 degrees Fahrenheit. Pressing the “+” button raises the temperature by 10 degrees, while pressing the “-” button lowers it by the same amount. For faster adjustments, simply hold down the desired button. The temperature will then increase or decrease rapidly, allowing you to quickly set the optimal temperature for your chosen recipe. The temperature range of the Power Air Fryer XL extends from 180 degrees Fahrenheit to 400 degrees Fahrenheit, providing you with the flexibility to cook a wide variety of dishes to perfection.
4.4 Preset Button
The Preset Button, often marked with a “M,” gives you quick access to pre-programmed settings for common foods. By selecting this button, you can cycle through seven popular cooking options. Each preset is designed with specific time and temperature settings that have been optimized for the chosen food category. For instance, selecting the “Fries” preset will automatically activate the ideal time and temperature combination for achieving crispy, perfectly cooked fries. This feature simplifies the cooking process, allowing you to effortlessly prepare a variety of dishes without needing to manually adjust the settings for each recipe. However, you always retain the option to override the preset function by manually increasing or decreasing the cooking time and temperature according to your preferences.
4.5 Preset Choices
The Power Air Fryer XL offers a variety of pre-programmed settings for different types of food, making cooking a breeze. You can choose from a selection of seven popular presets⁚ Fries, Chops (for smaller cuts of meat), Shrimp, Baked Goods, Chicken, Steak, and Fish. Each preset is designed with specific time and temperature combinations that have been optimized for achieving the best results for the selected food category. These presets simplify cooking, allowing you to effortlessly prepare a variety of dishes without needing to manually adjust the settings for each recipe. This feature is particularly helpful for busy individuals or those new to air frying, as it takes the guesswork out of achieving delicious and perfectly cooked meals.
4.6 Time and Temperature Display
The Power Air Fryer XL features a clear and intuitive display that keeps you informed about the cooking progress. Located on the control panel, the display shows the current temperature and the remaining cooking time. This allows you to monitor the cooking process closely and adjust the settings as needed. The display also provides visual cues, such as the spinning fan icon, which indicates that the unit is powered on and the heating element is active. The star-shaped red heat light, located within the center of the fan, illuminates when the unit is in cook or preheat mode. These visual indicators provide a clear indication of the air fryer’s status, ensuring you have complete control over your cooking experience.
4.7 Spinning Fan Display
The spinning fan display is a key visual indicator on your Power Air Fryer XL. This dynamic icon appears on the control panel when the unit is turned on and continues to spin for up to 20 seconds after the unit is turned off. The spinning fan signifies that the air fryer is actively circulating hot air, ensuring even cooking and crispy results. The fan display also features a red, star-shaped LED light located in the center. This light illuminates when the unit is in cook or preheat mode, providing a clear visual confirmation that the air fryer is heating up and ready to cook your food to perfection. The spinning fan display serves as a constant reminder that the appliance is working diligently to create delicious and healthy meals.
Cooking with the Power Air Fryer XL
The Power Air Fryer XL is a versatile appliance that can cook a wide variety of foods. With its rapid hot air technology, you can enjoy crispy, delicious meals with minimal oil. The air fryer’s intuitive control panel allows you to select the optimal cooking temperature and time for your desired recipe. Whether you’re craving crispy fries, succulent chicken, or perfectly grilled vegetables, the Power Air Fryer XL delivers exceptional results. This manual provides detailed instructions and helpful tips to guide you through the cooking process, ensuring that every meal you prepare is a success. With a little practice and creativity, you’ll discover endless possibilities for culinary exploration with your Power Air Fryer XL.